1.1
Copyright © 2000, 2007 Liferay Inc.
| Revision History | |
|---|---|
| Revision 1.0 | December 20th, 2006 |
| Revision 1.1 | February 19th, 2007 |
|
Added information about setting up the workflow and setting up and deploying several Liferay instances | |
Table of Contents
- Preface
- 1. Installation Options
- 2. Installing a Liferay Bundle
- 3. Detailed Installation Procedure
- 4. Configuring Liferay Portal Paths
- 5. Integration with External Systems
- 6. Multiple Portal Instances
- 7. Conclusion
Intended audience. This installation guide for Liferay Portal 4 is still a work in progress and will be updated frequently with new content. Contributions are welcome. It explains from the simplest installation methods intended for people reviewing Liferay to the most elaborate ones that will serve those wanting to install Liferay in servers. All Liferay supported servers and databases are covered.
Liferay version. This guide has been written for Liferay 4.2. Some details might be slightly different for previous 4.x versions. Do not expect it to be accurate for older versions.
Related documents. If this is not what you are looking for consider the following related documents
Liferay Portal 4 - Customization Guide
Liferay Portal 4 - Portal Administration Guide
Liferay Portal 4 - Development in the Extension Environment
More information and support. If you are looking for help for a specific issue we invite you to use our community forums: http://www.liferay.com/web/guest/devzone/forums to ask your questions. We also offer professional support services ([email protected]) where your company will be assigned a Liferay developer ensuring your questions are answered promptly so that your project is never compromised. Purchased support always gets first priority. This business model allows us to build a company that can contribute a great portal to the open source community. If your company uses Liferay, please consider purchasing support. Liferay has an extremely liberal license model (MIT, very similar to Apache and BSD), which means you can rebundle Liferay, rename it, and sell it under your name. We believe free means you can do whatever you want with it.
Liferay Portal can be installed through different methods depending on your specific needs. The installation options can be grouped into three main types:
Using an open source bundle: the bundles are the easiest and fastest installation method. They include an embedded database so all it takes to do the installation is to install a Java SE runtime environment, unzip, and run the bundle. It is recommended for people that want to review Liferay's functionality or for those who need to have Liferay working quickly.
Detailed installation procedure: explains how to install the portal in an existing application server or one that has been installed using vendor packages. This option is available for all the supported application servers. It is recommended for production environments and deployment to a proprietary app. server.
Using the ext environment: this option provides a full development environment to extend the functionality provided by Liferay. It is recommended for installation in the personal computers of developers doing the customization. It will not be covered in this guide. Refer to the developer guides for more information.
Liferay is provided in two editions so it is necessary to choose the one that better fits your specific needs. The reason they exist is because there are various opinions on the use of EJBs. With or without EJBs, we leverage our flexible Spring base architecture with the same code base.
Liferay Portal Enterprise: uses Enterprise Java Beans (EJB) and the services provided by them. This edition can only be deployed in full JavaEE applicaton servers.
Liferay Portal Professional: uses POJOs plus the functionalities provided by Spring and can be deployed in a servlet container.
Both editions provide the exact same functionality. The main reasons for choosing one over the other will come down to budget limitations or performance and reliability issues. To determine which edition is best for a specific case, it is necessary to perform tests that will simulate the real usage and load of the system.
Table of Contents
Liferay Portal is distributed with the following bundle options for the Professional Edition:
Jetty
Resin
Tomcat (JDK 1.4 edition)
Tomcat (JDK 5.0 edition)
The following options are offered for the Enterprise Edition:
Geronimo+Tomcat
JBoss+Jetty
JBoss+Tomcat
JOnAS+Jetty
JOnAS+Tomcat
Glassfish
Pramati
Choose your preferred bundle and download it from the downloads page. Then follow the following steps described next.
Once you have downloaded the bundle you can have Liferay Portal running very quickly following these steps:
Download and install JavaSE 5.0 if you have not done so already. If you picked the Tomcat (JDK 1.4 bundle), use the JavaSE 1.4 version instead. Make sure you have defined the JAVA_HOME environment variable.
Unzip the bundle to your applications directory. For example: c:\apps in Windows or /usr/local/ in Linux or UNIX variants.
Go to the bin directory inside the application server directory and run it using the provided script. The name of the script will depend on the application server and you will have to use the version provided for your operating system. Names are usually pretty intuitive such as run.bat, startup.bat, jonas.bat...etc. When in a Unix environment, the batch file to start the server will end with the extension sh instead of bat and it is necessary to make the script executable by running chmod +x filename.sh. It is often neccessary to run the executable from the directory where it resides.
Once the application server has finished initialization (the first time it might take a few minutes) open your browser and go to htp://localhost:8080 (assuming local installation otherwise change localhost with the host name or IP).
The bundle comes with an embeded HSQL database loaded with sample data from the public website of Liferay. You can try Liferay as an anonymous user by navigating your local version the public website.
Login as an administrator using the following data:
User:
[email protected]Password:
test
Congratulations! you now have a running copy of Liferay. Refer to the end user documentation for more information about how to use the administration functionalities and the bundled portlets. Refer to the development and customization documentation to learn how to adapt Liferay to your needs. The next section provides information
Once the bundle is up and running you can start using Liferay Portal, but before opening the service to general public some configuration is recommended. This configuration will allow an optimized performance when multiple concurrent uses access the portal and activates all of Liferay Portal features by integration with external systems
In the following instructions, Liferay Portal uses an embeded database. While this is a good method to have it up and running fast for reviewing or developing, it has several drawbacks:
Only one user can access it at a time. This is because the data is stored on a file on disk and HSQL locks it when doing changes.
The data is stored inside the application server and might be lost on redeployment.
Fortunately, Liferay has great support for a good number of production-ready databases, and it is easy to configure Liferay to use them. The exact instructions will depend on the application server and database. Refer to the detailed installation for instructions on how to configure MySQL or other databases.
The bundled configuration connects to a mail SMTP and IMAP server installed in the same machine as the application server (refered to as localhost in the configuration). It also assumes that certain paths are present in the system.
Refer to chapters 4 and 5 for more information on how to change the system defaults. Also read Liferay Portal 4 - Customization Guide for a complete reference of the configuration options provided by Liferay Portal.
Table of Contents
This chapter contains detailed instructions for installing Liferay Portal using its EAR or WAR distribution. This allows system administrators to deploy Liferay in existing application server installations. It is recommended to have a good undertanding of the deployment procedure of Java EE applications in the application server of choice.
Please note that while Liferay Portal supports a wide rage of databases, for brevity this section assumes MySQL as the database. To use other databases, please subsitute that database JDBC driver and URL to those required by your database. Consult the databases section below for special instructions for some databases.
![[Note]](images/note.png) | Note |
|---|---|
The following instructions assume an installation on a local
machine. When installing to a server just change
|
Download and install Geronimo/Tomcat into your preferred directory. From now on, the directory where you installed Gernonimo will be referred to as
GERONIMO_HOME.Download and install JDK 5 . Set an environment variable called
JAVA_HOMEto point to your JDK directory.Download MySQL from www.mysql.com and install.
Download the WAR for the professional edition of Liferay Portal: liferay-portal-4.2.0.war.
Populate your database with the portal schema and default data.
Download Liferay Portal 4.2.0 SQL Scripts.and extract the script
create-mysql.sqlIn command prompt, run mysql script by entering mysql < create-mysql.sql.
Edit
GERONIMO_HOME\bin\geronimo.batinsert at line 219:
set JAVA_OPTS=-Xms128m -Xmx512m -Dfile.encoding=UTF8 -Duser.timezone=GMT
Download the Portal 4.2.0 Dependencies.
Point browser to localhost:8080/console to enter Administration Console.
Login in as User: system and Password: manager
Click Common Libs under Services.
Click Browse, find portal-kernel.jar and add
Group: Liferay
Artifact: Portal-kernel
Version: enter version number of jar
Type: Jar
Click Install
Repeat the last step for each of the libraries in the dependencies ZIP file.
Click Database Pools under Services
Click Using the Geronimo database pool wizard
Name of Database Pool: LiferayPool
Database Type: MySql
Click Next
Driver Jar: click Download a Driver and select MySQL Connector/J3.0.17
Click Next
DB User Name: <none>
DB Password: <none>
Port: 3306 (default)
Host: localhost
Database: lportal
Click Next
Click Test Connection
Click Deploy
Click Deploy New under Applications
Archive: Browse for lieray-portal-4.2.0.war
Click Install
Click Web App WARs
Uninstall geronimo/welcome-tomcat/1.1/car
Start -default/liferayportal/xxxxxxx.../war
Open your browser to http://localhost:8080. Click on My Liferay at the upper right hand corner to enter the login screen. Your login is [email protected] and your password is test.
Download and install JBoss AS into your preferred directory. From now on, the directory where you installed Tomcat will be referred to as
$JBOSS_HOME.Download and install JDK 5 . Set an environment variable called
JAVA_HOMEto point to your JDK directory.Download MySQL from www.mysql.com and install.
Edit
$JBOSS_HOME/server/default/conf/jboss-service.xml:<classpath codebase="${jboss.server.lib.url:lib}/ext" archives="*"/>Create directory
$JBOSS_HOME/directory/server/default/deploy/jbossweb-jetty.sar. Downloadjetty-5.1.10-jboss-4.0.2.sarand unzip to directory.Edit
$JBOSS_HOME/directory/server/default/deploy/jbossweb-jetty.sar/webdefault.xml:Replace servlet entry in lines 206 to 222:<servlet> <servlet-name>jsp</servlet-name> <servlet-class>org.apache.jasper.servlet.JspServlet</servlet-class> <init-param> <param-name>logVerbosityLevel</param-name> <param-value>DEBUG</param-value> </init-param> <init-param> <param-name>fork</param-name> <param-value>false</param-value> </init-param> <init-param> <param-name>xpoweredBy</param-name> <param-value>false</param-value> </init-param> <load-on-startup>0</load-on-startup> </servlet>With:
  <servlet>
    <servlet-name>jsp</servlet-name>
    <servlet-class>org.apache.jasper.servlet.JspServlet</servlet-class>
    <init-param>
        <param-name>logVerbosityLevel</param-name>
        <param-value>DEBUG</param-value>
    </init-param>
    <init-param>
        <param-name>fork</param-name>
        <param-value>false</param-value>
    </init-param>
    <init-param>
        <param-name>scratchdir</param-name>
        <param-value>../server/default/work</param-value>
    </init-param>
    <init-param>
        <param-name>xpoweredBy</param-name>
        <param-value>false</param-value>
    </init-param>
    <load-on-startup>0</load-on-startup>
  </servlet>
Remove
$JBOSS_HOME/server/default/deploy/jbossweb-tomcat55.sar.Remove
$JBOSS_HOME/server/default/deploy/management.Create file
$JBOSS_HOME/server/default/deploy/liferay-ds.xmlwith following content:<?xml version="1.0"?> <datasources> <local-tx-datasource> <jndi-name>jdbc/LiferayPool</jndi-name> <connection-url> jdbc:mysql://localhost/lportal?useUnicode=true&characterEncoding=UTF-8 </connection-url> <driver-class>com.mysql.jdbc.Driver</driver-class> <user-name></user-name> <password></password> <min-pool-size>0</min-pool-size> </local-tx-datasource> </datasources>Go to
$JBOSS_HOME/server/default/lib/and create new directoryext. Download mysql-connector-java-{$version}-bin.jar and copy to this directory. (This is the JDBC connector for MySQL, for other databases, go to appropriate website to download.)Populate your database with the portal schema and default data.
Download script create-mysql.sql from Liferay Portal 4.2.0 SQL Scripts.
In command prompt, run mysql script by entering mysql < create-mysql.sql.
Download Liferay's Portal 4.2.0 Dependencies.
Unzip to
$JBOSS_HOME/server/default/lib/ext.
Set mail properties by replacing the contents of
$JBOSS_HOME/server/default/deploy/mail-service.xmlwith:<?xml version="1.0"?> <server> <mbean code="org.jboss.mail.MailService" name="jboss:service=MailSession"> <attribute name="JNDIName">mail/MailSession</attribute> <attribute name="User">nobody</attribute> <attribute name="Password">password</attribute> <attribute name="Configuration"> <configuration> <property name="mail.store.protocol" value="imap" /> <property name="mail.transport.protocol" value="smtp" /> <property name="mail.imap.host" value="localhost" /> <property name="mail.pop3.host" value="localhost" /> <property name="mail.smtp.host" value="localhost" /> </configuration> </attribute> </mbean> </server>
Configure JAAS. Edit $
JBOSS_HOME/server/default/conf/login-config.xmland comment out the entire XML for policy 'other' in lines 140-156.<!--<application-policy name = "other">--> ... <!--<authentication> <login-module code = "org.jboss.security.auth.spi.UsersRolesLoginModule" flag = "required" /> </authentication> </application-policy>-->Deploy liferay-portal-4.2.0.ear.
Create directory
$JBOSS_HOME/server/default/deploy/liferay-portal.earUnzip
liferay-portal-4.2.0.earto directoryGo to
JBOSS_HOME/server/default/deploy/liferay-portal.ear/libMove
dom4j.jar,jaxen.jarJBOSS_HOME/libMove
commons-collections.jartoJBOSS_HOME/server/default/lib
Remove
hibernate3.jar,jboss-hibernate.jarfromJBOSS_HOME/server/default/lib
Edit
$JBOSS_HOME/server/default/deploy/jbossjca-service.xml:Change Debug attribute in line 63 from true to false:
<attribute name="Debug">false</attribute>
In
            $JBOSS/server/default/deploy/jbossws14.sar/META-INF/jboss-service.xml
Comment out deployer service for JSE and EJB2.1 endpointsline 36-40
<!--<mbean name="jboss.ws:service=WebServiceDeployerJSE" code="org.jboss.ws.server.WebServiceDeployerJSE">
      <depends-list optional-attribute-name="Interceptables">
         <depends-list-element>jboss.web:service=WebServer</depends-list-element>
      </depends-list>
   </mbean>-->
lines 45-49
   <!--<mbean name="jboss.ws:service=WebServiceDeployerEJB21" code="org.jboss.ws.server.WebServiceDeployerEJB21">
      <depends-list optional-attribute-name="Interceptables">
         <depends-list-element>jboss.ejb:service=EJBDeployer</depends-list-element>
      </depends-list>
   </mbean>-->
lines 72-75
<!--<mbean name="jboss.ws:service=WebServiceDeployerNestedJSE" code="org.jboss.ws.server.WebServiceDeployerNestedJSE">
      <depends optional-attribute-name="MainDeployer" proxy-type="attribute">jboss.system:service=MainDeployer</depends>
      <depends>jboss.ws:service=WebServiceDeployerJSE</depends>
   </mbean>-->
Edit
$JBOSS_HOME/server/default/deploy/jms/jbossmq-destinations-service.xml. Clear out text between server tags:<?xml version="1.0"?> <server> </server>
Start JBoss. Open your browser to http://localhost:8080. Click on My Liferay at the upper right hand corner to enter the login screen. Your login is [email protected] and your password is test.
Download and install JBoss AS into your preferred directory. From now on, the directory where you installed Tomcat will be referred to as $JBOSS_HOME.
Download and install JDK 5 . Set an environment variable called
%JAVA_HOME%(in Windows) or$JAVA_HOME(in Linux/UNIX) to point to your JDK directory.Download MySQL from www.mysql.com and install.
Download liferay-portal-4.2.0.ear.
Edit
$JBOSS_HOME/server/default/conf/jboss-service.xml:<classpath codebase="${jboss.server.lib.url:lib}/ext" archives="*"/>Delete
$JBOSS_HOME/server/default/deploy/jbossweb-tomcat55.sar/ROOT.war.Edit
$JBOSS_HOME/server/default/deploy/jbossweb-tomcat55.sar/conf/web.xml:replace default servlet (lines 79-91) :
<servlet> <servlet-name>default</servlet-name> <servlet-class>org.apache.catalina.servlets.DefaultServlet</servlet-class> <init-param> <param-name>debug</param-name> <param-value>0</param-value> </init-param> <init-param> <param-name>listings</param-name> <param-value>true</param-value> </init-param> <load-on-startup>1</load-on-startup> </servlet>with:
<servlet> <servlet-name>default</servlet-name> <servlet-class>org.apache.catalina.servlets.DefaultServlet</servlet-class> <init-param> <param-name>debug</param-name> <param-value>0</param-value> </init-param> <init-param> <param-name>listings</param-name> <param-value>false</param-value> </init-param> <init-param> <param-name>input</param-name> <param-value>4096</param-value> </init-param> <init-param> <param-name>output</param-name> <param-value>4096</param-value> </init-param> <load-on-startup>1</load-on-startup> </servlet>Create
$JBOSS_HOME/server/default/deploy/liferay-ds.xml with following content:<datasources> <local-tx-datasource> <jndi-name>jdbc/LiferayPool</jndi-name> <connection-url> jdbc:mysql://localhost/lportal?useUnicode=true&characterEncoding=UTF-8 </connection-url> <driver-class>com.mysql.jdbc.Driver</driver-class> <user-name></user-name> <password></password> <min-pool-size>0</min-pool-size> </local-tx-datasource> </datasources>Go to
$JBOSS_HOME/server/default/lib/and create new directory ext. Download mysql-connector-java-{$version}-bin.jar and copy to this directory. (This is the JDBC connector for MySQL, for other databases, go to appropriate website to download.)Populate your database with the portal schema and defult data.
Download script create-mysql.sql from Liferay Portal 4.2.0 SQL Scripts.
In command prompt, run mysql script by entering mysql < create-mysql.sql.
Download Liferay 's Portal 4.2.0 Dependencies.
Unzip into
$JBOSS_HOME/server/default/lib/ext.
Set mail properties by replacing the contents of
$JBOSS_HOME/server/default/deploy/mail-service.xml with:<?xml version="1.0"?> <server> <mbean code="org.jboss.mail.MailService" name="jboss:service=MailSession"> <attribute name="JNDIName">mail/MailSession</attribute> <attribute name="User">nobody</attribute> <attribute name="Password">password</attribute> <attribute name="Configuration"> <configuration> <property name="mail.store.protocol" value="imap" /> <property name="mail.transport.protocol" value="smtp" /> <property name="mail.imap.host" value="localhost" /> <property name="mail.pop3.host" value="localhost" /> <property name="mail.smtp.host" value="localhost" /> </configuration> </attribute> </mbean> </server>
Configure JAAS. Edit
$JBOSS_HOME/server/default/conf/login-config.xmland comment out the entire XML for policy other in lines 140-156.<!--<application-policy name = "other">--> ... <!--<authentication> <login-module code = "org.jboss.security.auth.spi.UsersRolesLoginModule" flag = "required" /> </authentication> </application-policy>-->Deploy liferay-portal-4.2.0.ear.
create new directory
$JBOSS_HOME/server/default/deploy/liferay-portal.earunzip liferay-portal-4.2.0.ear to directory
go into
$JBOSS_HOME/server/default/deploy/liferay-portal.ear/libmove dom4j.jar,jaxen.jar to JBOSS_HOME/lib
move commons-collections.jar goes to JBOSS_HOME/server/default/lib
remove hibernate3.jar,jboss-hibernate.jar from JBOSS_HOME/server/default/lib
Edit JBOSS_HOME/server/default/deploy/jbossjca-service.xml:
change Debug attribute in line 63 from true to false:
<attribute name="Debug">false</attribute>
Edit JBOSS_HOME/server/default/deploy/jms/jbossmq-destinations-service.xml. Clear out text between server tags:
<?xml version="1.0"?>

<server>
</server>
Start JBoss. Open your browser to http://localhost:8080. Click on My Liferay at the upper right hand corner to enter the login screen. Your login is [email protected] and your password is test.
Download and install JDK 1.4 or 1.5. Set an environment variable called
%JAVA_HOME%(in Windows) or$JAVA_HOME(in Linux/UNIX) to point to your JDK directory.Download MySQL from www.mysql.com and install.
Download and install Jetty 5.1.10-all.zip. Note: Only this version of Jetty is supported by Liferay. Others may work but will not be covered in this documentation. From now on the home directory where you installed Jetty will be called $JETTY_HOME.
Download liferay-portal-4.2.0.war.
Download Liferay's Portal 4.2.0 Dependencies.
Create a $JETTY_HOME/lib/ext directory and copy these two files there. If the files do not extract to this directory, make sure they are in the correct directory by moving them there.
Populate your database with the portal schema and default data.
Download script create-mysql.sql from Liferay Portal 4.2.0 SQL Scripts
In command prompt, run mysql script by entering
mysql < create-mysql.sql
Edit $JETTY_HOME/extra/etc/start-plus.config.
$(jetty.home)/lib/ext/
$(jetty.home)/lib/ext/*
Create a data source bound to jdbc/LiferayPool by editing
$JETTY_HOME/etc/jetty.xml.<Call name="addService"> <Arg> <New class="org.mortbay.jetty.plus.JotmService"> <Set name="Name">TransactionMgr</Set> <Call name="addDataSource"> <Arg>jdbc/LiferayPool</Arg> <Arg> <New class="org.enhydra.jdbc.standard.StandardXADataSource"> <Set name="DriverName">com.mysql.jdbc.Driver</Set> <Set name="Url">jdbc:mysql://localhost/lportal?useUnicode=true&characterEncoding=UTF-8</Set> <Set name="User"></Set> <Set name="Password"></Set> </New> </Arg> <Arg> <New class="org.enhydra.jdbc.pool.StandardXAPoolDataSource"> <Arg type="Integer">4</Arg> <Set name="MinSize">4</Set> <Set name="MaxSize">15</Set> </New> </Arg> </Call> </New> </Arg> </Call>Download mysql-connector-java-{$version}-bin.jar and copy to to
$JETTY_HOME/lib/ext.. (This is the JDBC connector for MySQL, for other databases, go to appropriate website to download.)Create a mail session bound to mail/MailSession.
Edit
$JETTY_HOME/etc/jetty.xmland configure a mail session.<Call name="addService"> <Arg> <New class="org.mortbay.jetty.plus.MailService"> <Set name="Name">MailService</Set> <Set name="JNDI">mail/MailSession</Set> <Put name="mail.smtp.host">localhost</Put> </New> </Arg> </Call>
Create
$JETTY_HOME/etc/jaas.config.PortalRealm { com.liferay.portal.kernel.security.jaas.PortalLoginModule required; };Create directory
$JETTY_HOME/webapps/root and
            unpack liferay-portal-4.2.0.war.
Go to
$JETTY_HOME/webapps/root/WEB-INF/lib and
            delete xercesImpl.jar and xml-apis.jar.
Copy
$JETTY_HOME/webapps/root/WEB-INF/lib/commons-logging.jar
            to JETTY_HOME/ext
(overwriting existing one).Create batch file.
Create a directory
$JETTY_HOME/binCreate run.bat (Note, this is for Windows platform. For other platforms, configure accordingly)
@echo off

if "" == "%JAVA_HOME%" goto errorJavaHome

%JAVA_HOME%/bin/java -Xmx512m -Dfile.encoding=UTF8 -Duser.timezone=GMT -Djava.security.auth.login.config=../etc/jaas.config -DSTART=../extra/etc/start-plus.config -jar ../start.jar ../etc/jetty.xml

goto end

:errorJavaHome
	echo JAVA_HOME not defined.

	goto end

:end
Note: If you get a java.lang.OutOfMemoryError exception while starting up Jetty, give your JVM more memory by setting -Xmx512m.
Start Liferay by running run.bat. Open your browser to http://localhost:8080. Click on My Liferay at the upper right hand corner to enter the login screen. Your login is [email protected] and your password is test.
Download and install Tomcat 5.5.17 into your preferred directory. From now on, the directory where you installed Tomcat will be referred to as $TOMCAT_HOME.
Download and install JDK 5 . Set an environment variable called
%JAVA_HOME%(in Windows) or$JAVA_HOME(in Linux/UNIX) to point to your JDK directory.Note: If you are using JDK 1.4, you must download and install the JDK 1.4 Compatability Package at tomcat.apache. For JDK 1.4 users: delete
$TOMCAT_HOME/webapps/ROOT/WEB-INF/lib/xercesImpl.jar. For JDK 5 users: move$TOMCAT_HOME/webapps/ROOT/WEB-INF/lib/xercesImpl.jartoTOMCAT_HOME/common/endorsed.Download MySQL from www.mysql.com and install.
Create and edit
$TOMCAT_HOME/conf/Catalina/localhost/ROOT.xmlto set up the portal web application.<Context path=""> </Context>
Download liferay-portal-4.2.0.war.
Download Liferay's Portal 4.2.0 Dependencies.
Create a
$TOMCAT_HOME/common/lib/extdirectory and unzip the dependencies ZIP in there. If the files do not extract to this directory, make sure they are in the correct directory by moving them there.
Edit
$TOMCAT_HOME/conf/catalina.properties.common.loader= ${catalina.home}/common/classes,\ ...\ ${catalina.home}/common/lib/ext/*.jarConfigure data sources for your database. Make sure the JDBC driver for your database is accessible by Tomcat.
Download mysql-connector-java-{$version}-bin.jar. (This is the JDBC connector for MySQL, for other databases, go to appropriate website to download.)
Copy to
$TOMCAT_HOME/common/lib/ext.
Edit
$TOMCAT_HOME/conf/Catalina/localhost/ROOT.xml.<Context...> <Resource name="jdbc/LiferayPool" auth="Container" type="javax.sql.DataSource" driverClassName="com.mysql.jdbc.Driver" url="jdbc:mysql://localhost/lportal?useUnicode=true&characterEncoding=UTF-8" username="" password="" maxActive="100" maxIdle="30" maxWait="10000" /> </Context>Populate your database with the portal schema and default data.
Download script create-mysql.sql from Liferay Portal 4.2.0 SQL Scripts.
In command prompt, run mysql script by entering
mysql < create-mysql.sql
Create a mail session bound to mail/MailSession.
Edit
$TOMCAT_HOME/conf/Catalina/localhost/ROOT.xmland configure a mail session.<Context...> <Resource name="mail/MailSession" auth="Container" type="javax.mail.Session" mail.transport.protocol="smtp" mail.smtp.host="localhost" /> </Context>
Configure JAAS.
Edit
$TOMCAT_HOME/conf/Catalina/localhost/ROOT.xmland configure a security realm.<Context...> <Realm className="org.apache.catalina.realm.JAASRealm" appName="PortalRealm" userClassNames="com.liferay.portal.security.jaas.PortalPrincipal" roleClassNames="com.liferay.portal.security.jaas.PortalRole" debug="99" useContextClassLoader="false" /> </Context>
Repeat this step for a file called
$TOMCAT_HOME/conf/Catalina/localhost/tunnel.xmlif you want to enable Liferay's HTTP tunneling.Create
$TOMCAT_HOME/conf/jaas.config.PortalRealm { com.liferay.portal.kernel.security.jaas.PortalLoginModule required; };Edit
$TOMCAT_HOME/bin/catalina.batso that Tomcat can reference the login module.rem ----- Execute... set JAVA_OPTS=-Xms128m -Xmx512m -Dfile.encoding=UTF8 -Duser.timezone=GMT -Djava.security.auth.login.config=%CATALINA_HOME%/conf/jaas.config
Delete contents
$TOMCAT_HOME/webapps/ROOT directory.Unpack liferay-portal-4.2.0.war to
$TOMCAT_HOME/webapps/ROOT.For supporting UTF-8 UIRIEncoding, edit
$TOMCAT_HOME/conf/server.xml.<!-- Define a non-SSL HTTP/1.1 Connector on port 8080 --> <Connector port="8080" maxHttpHeaderSize="8192" maxThreads="150" minSpareThreads="25" maxSpareThreads="75" enableLookups="false" redirectPort="8443" acceptCount="100" connectionTimeout="20000" disableUploadTimeout="true" URIEncoding="UTF-8" />Run Tomcat, point browser to http://localhost:8080. Sign in as [email protected] and password test
Download and install Resin into your preferred directory. From now on, the directory where you installed Resin will be referred to as
$JBOSS_HOME.Download and install JDK 5 . Set an environment variable called
%JAVA_HOME%(in Windows) or$JAVA_HOME(in Linux/UNIX)Download MySQL from www.mysql.com and install.
Edit
$RESIN_HOME/conf/resin.conf.replace lines 60-64
<class-loader>
      <tree-loader path="${resin.home}/lib"/>
      <tree-loader path="${server.root}/lib"/>
    </class-loader>
with
<class-loader>
      <tree-loader path="${resin.home}/lib"/>
      <tree-loader path="${server.root}/lib"/>
      <compiling-loader path="${server.rootDir}/common/classes"/>
      <library-loader path="${server.rootDir}/common/lib"/>
    </class-loader>
add:
<database> <jndi-name>jdbc/LiferayPool</jndi-name> <driver type="com.mysql.jdbc.Driver"> <url>jdbc:mysql://localhost/lportal?useUnicode=true&characterEncoding=UTF-8</url> <user></user> <password></password> </driver> <prepared-statement-cache-size>8</prepared-statement-cache-size> <max-connections>20</max-connections> <max-idle-time>30s</max-idle-time> </database> <resource jndi-name="mail/MailSession" type="javax.mail.Session"> <init> <mail.store.protocol>imap</mail.store.protocol> <mail.transport.protocol>smtp</mail.transport.protocol> <mail.imap.host>localhost</mail.imap.host> <mail.pop3.host>localhost</mail.pop3.host> <mail.smtp.host>localhost</mail.smtp.host> </init> </resource> <system-property javax.xml.parsers.DocumentBuilderFactory="org.apache.xerces.jaxp.DocumentBuilderFactoryImpl" /> <system-property javax.xml.parsers.SAXParserFactory="org.apache.xerces.jaxp.SAXParserFactoryImpl" /> <system-property javax.xml.transform.TransformerFactory="org.apache.xalan.processor.TransformerFactoryImpl" /> <system-property org.xml.sax.driver="org.apache.xerces.parsers.SAXParser" />
Go to
$RESIN_HOMEand create new directorycommon\lib. Downloadmysql-connector-java-{$version}-bin.jarand copy to this directory. (This is the JDBC connector for MySQL, for other databases, go to appropriate website to download.)Populate your database with the portal schema and default data.
Download script create-mysql.sql from Liferay Portal 4.2.0 SQL Scripts.
In command prompt, run mysql script by entering
mysql < create-mysql.sql.
Download the Liferay Portal 4.2.0 Dependencies and unzip into
$RESIN_HOME\common\lib.Delete contents of
$RESIN_HOME\webapps\ROOT.Unzip
liferay-portal-4.2.0.warto$RESIN_HOME\webapps\ROOT.Download the sources of Liferay Portal and unzip them to a temporal directory:
Go to
$\lib\development\and copyactivation.jarandmail.jarto$RESIN_HOME\common\lib,saxpath.jarandxalan.jarto$RESIN_HOME\libGo to
$\lib\portal and copy xercesImpl.jarandxml-apis.jar to $RESIN_HOME\lib
Go to
$RESIN_HOME\binand createrun.bat...\httpd.exe -Xmx512m -Dfile.encoding=UTF-8 -Duser.timezone=GMT
Start Resin. Open your browser to http://localhost:8080. Click on Access at the upper right hand corner to enter the login screen. Your login is [email protected] and your password is test.
Note: Throughout this installation and configuration process, Websphere will prompt you to Click Save to apply changes to Master Configuration. Do so intermittently to save your changes.
Download Liferay Portal Professional 4.2.0 WAR , unzip and compile.
Install IBM Websphere.
Install MySql.
Download and extract these Liferay jars to websphere\appserver\lib\ext.
Dependency libraries (Liferay Portal 4.2.0 Dependencies)
liferay-portal-jaas.jar (Liferay Portal Enterprise 4.2.0 JAAS Libraries)
mysql-connector-java-3.x.x-bin.jar (MySQL)
Start Websphere.
Open Adminstrative Console and login.
Click Resources, click JDBC Providers.
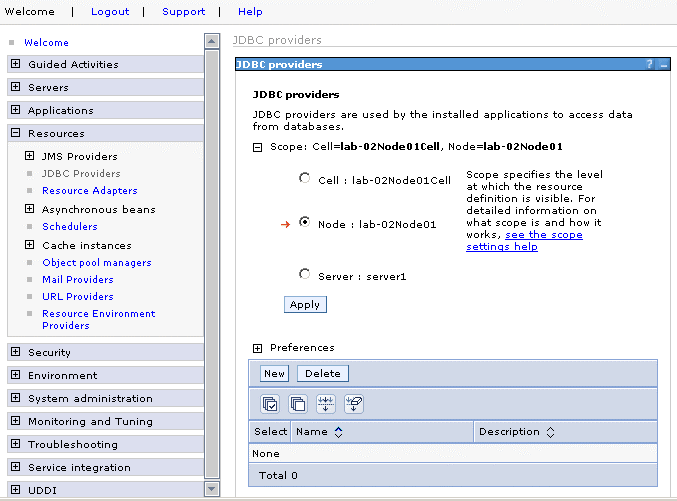
Click Next.
For name, enter name of jdbc provider, e.g. liferayjdbc.
Clear any text in classpath.
For Implementation class name enter
com.mysql.jdbc.jdbc2.optional.MysqlConnectionPoolDataSource
Click OK.
Click Data sources under Additional Properties.
Click New.
Enter a name: liferaydatabasesource.
Enter JNDI, jdbc/LiferayPool.
Everything else should stay to default.
Click OK.

Under Additional Properties, click Custom properties.
Click New.
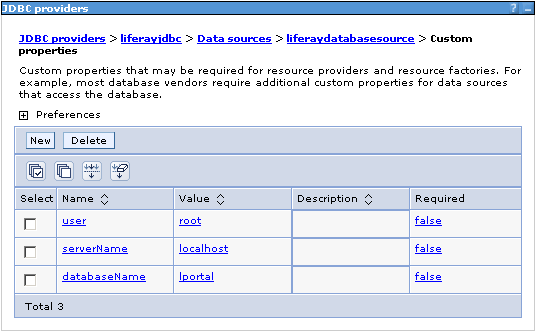
Create 3 custom properties by entering Name, Value and clicking OK for each row on this table.
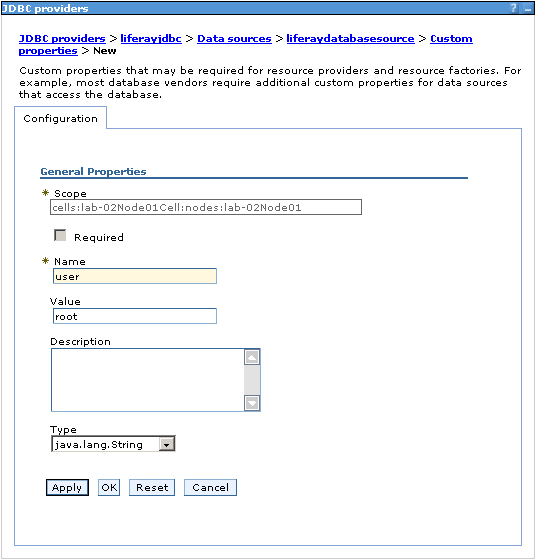
When done correctly, custom properties should look like this:
Download Liferay Portal 4.2.0 SQL Scripts and extract
create-mysql.sql.In command prompt, run mysql script by entering
mysql <
              trunk\sql\create\create-mysql.sql
Click data sources test connection to test.
Click Resources, Mail providers.
Click Built-in Mail Provider.
Click Mail Sessions.
Click New.
Name: liferaymail
JNDI name: mail/MailSession
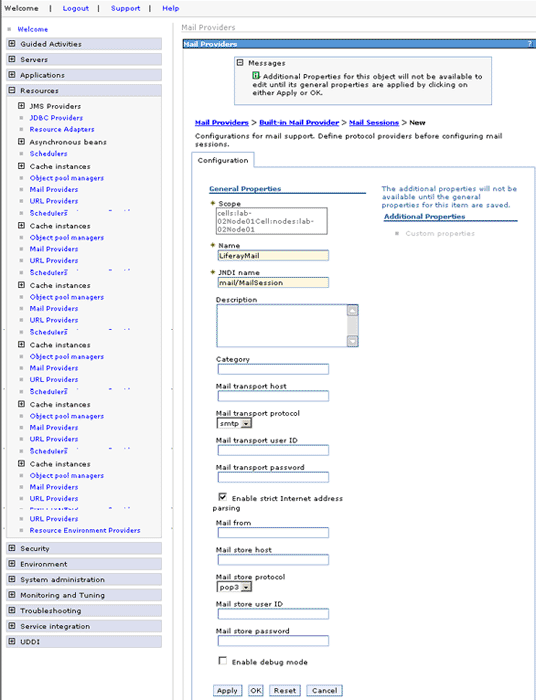
Click OK.
Click Security.
Click Global security.
Select Enable global security.
Deselect enforce java 2 security.
In Active user registry, select custom user registry.
Click Apply to go to Custom user registry page.
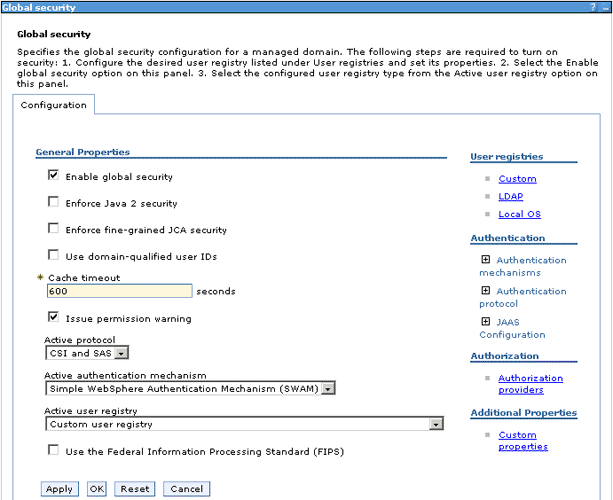
Enter 'system' for server user ID.
Enter 'password' for server user password.
Enter Custom registry class name
com.liferay.portal.security.jaas.ext.websphere.PortalUserRegistry.Click Apply.

Insert username/password into database.
Open a mysql console.
Enter
Use lportalEnter
Insert intoUser_ (companyId, userId, password_) values ('system', 'system', 'password');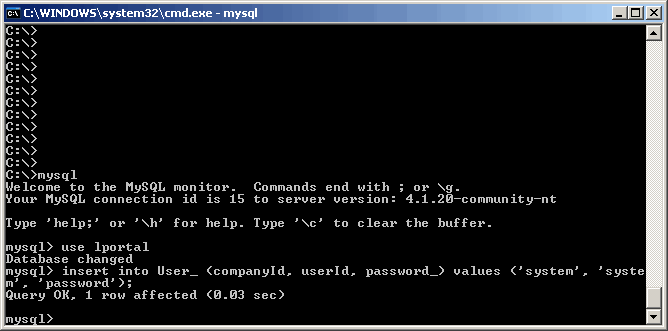
Click Applications, click Install new applications
Browse for liferay-portal-4.2.0.war.
Enter context root '/'.

Click Next
Select Generate Default Bindings>Override default bindings>Use default viral host name for web modules:

Click Next. Click Continue. For Steps 1 to 4, click Next to apply defaults.
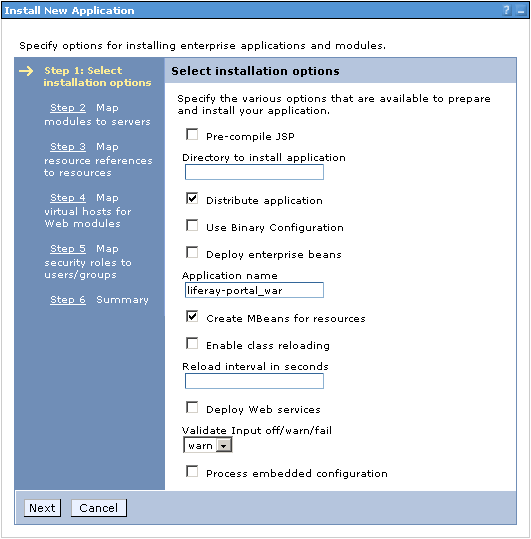
In Step 5, check all authenticated

Click Next.

Click Finish.
Wait for installation process.

Save this configuration to master configuration by clicking on System administration and Save Changes to Master Repository.
Applications.
Click Enterprise Applications.
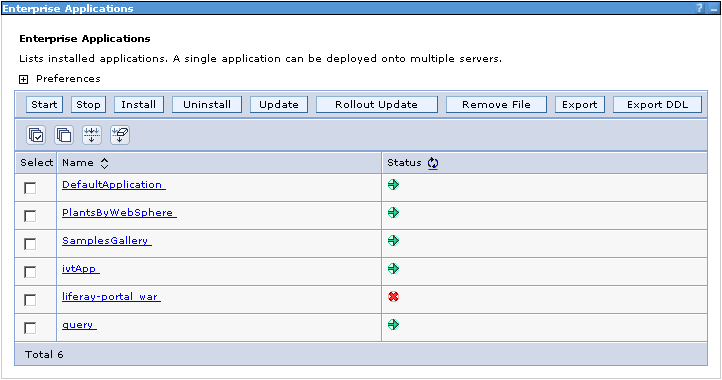
Uninstall DefaultApplication, PlantsByWebSphere and SamplesGallery.
Select liferay-portal.war, click start
Open up browser and point to http://localhost:9080. Liferay portal home page should be seen.
Edit your Stop the Server shortcut to set the user id and password. If you don't do this, you will not be able to stop the server after you restart WebSphere:
"C:\Program
              Files\WebSphere\AppServer\bin\stopServer.bat" server1 -user
              system -password password
Stop Websphere and retart it. Login on with 'system' for username and 'password' for password.
Please note that this documentation uses MySQL as the database. To use other databases, please subsitute that database JDBC driver and configure accordingly. Consult your Database documentation for more details. Below are notes for known special case instructions for other databases.
For Oracle 9 and 10 use jdbc driver ojdbc14.jar
For Oracle 10, also follow this step:
Edit portal.properties and add:
hibernate.jdbc.batch_size=0
Do not use the default setting of 20.
Liferay Portal's configuration is held in two files:
portal.properties and
system.properties. After installing the portal both
files can be found in:
Professional edition:
WAR-FILE/WEB-INF/classesEnterprise edition:
EAR-FILE/portal-ejb
The location of the WAR or EAR files will depend on the application
server. Check its documentation if you cannot find them. It is not
recommented to directly modify portal.properties and
system.properties. Instead create two files named
portal-ext.properties and
system-ext.properties.and write in only the
properties whose values you want to override. These two files can be
placed with the original one or in the global classpath of the application
server.
It is recommended to review and adjust the values of the following properties (shown with their default values at the time of writting):
auto.deploy.deploy.dir=/home/liferay/deploy: necessary to enable autodeploy
lucene.dir=/home/liferay/lucene/: necessary for search to work
jcr.jackrabbit.repository.root=/home/liferay/jackrabbit: necessary for the document library
For more information about this files and the configuration possibilities provided by Liferay, read the Liferay Portal 4 - Customization Guide.
Table of Contents
This chapter covers the steps necessary to integrate Liferay Portal with external systems. This configuration may be necessary for the correct operation provided by some the bundled portlets.
Liferay Portal can integrate with Washington IMAP+Sendmail, Cyrus IMAP+Postfix, and Dovecot+Postfix. Support for integration with Microsoft Exchange and other IMAP servers are planned and will be implemented in the near future.
The portal synchronizes with the mail server's user authentication by adding a mail server account when a portal account is added, deleting a mail server account when a portal account is deleted, and updating a mail server account when a portal account is updated. To do this, the portal must have privileges to modify and to update the mail server's user database.
The portal must also keep track of how email addresses map to
certain accounts. For example, in the default installation, the portal
maps the user id liferay.com.1 to the email
address [email protected].
One possible deployment scenario is to run the mail EJBs on the mail server and run the portal EJBs on the web server. In this case, the mail server and web server are two different machines. The portal EJBs will give abstract commands (add/delete/update user) to the remote mail EJBs to carry out. The mail EJBs then run the appropriate system commands for the specific mail server and operating system.
Another possible deployment scenario is to have the mail EJBs and
portal EJBs run on the same machine. This can all be configured by
editing portal.properties.
Users access their email through an IMAP server. Access is limited to IMAP so that the portal does not have to be programmed to know where to persist the mail.
Install Sendmail and Expect on your mail server. Expect allows you to add, delete, or update users in one command. An example script for Red Hat is included in /mail-ejb/scripts/redhat.
Configure /portal-ejb/classes/portal.properties for your mail server.
The following instructions assume:
The server envronment is linux
The server name is called PORTAL_HOST
You are logged in as root
The distribution is Liferay Portal Professional 3.2.0 (Bundled with Tomcat)
Tomcat is installed at /usr/local/tomcat
Tomcat is running under the user named tomcat, group name tomcat
You are using sendmail for email
Portal sendmail users are created under the path /home/liferay/users
sendmail is running on PORTAL_HOST
# Install expect command
apt-get install expect


# Give tomcat user a password
passwd tomcat


#give tomcat user a login shell
vi /etc/passwd
tomcat:x:500:500::/usr/local/tomcat:/bin/bash


# Use sudo to allow tomcat to add users
visudo

Defaults logfile=/var/log/sudolog
Defaults:tomcat    timestamp_timeout=-1, passwd_tries=1
tomcat  ALL=/usr/sbin/adduser, /usr/sbin/userdel, /usr/bin/passwd


# Enable UW-imap
vi /etc/xinet.d/imap

# default: off
# description: The IMAP service allows remote users to access their mail using \
#              an IMAP client such as Mutt, Pine, fetchmail, or Netscape \
#              Communicator.
service imap
{
       socket_type             = stream
       wait                    = no
       user                    = root
       server                  = /usr/sbin/imapd
       log_on_success  += HOST DURATION
       log_on_failure  += HOST
       disable                 = no
}


# Restart the xinetd deamon
/etc/rc.d/init.d/xinetd restart


# Add Tomcat mail/MailSession settings
vi /usr/local/tomcat/conf/Catalina/localhost/liferay.xml
               <parameter>
                       <name>mail.smtp.host</name>
                       <value>localhost</value>
               </parameter>
               <parameter>
                       <name>mail.imap.host</name>
                       <value>localhost</value>
               </parameter>
               <parameter>
                       <name>mail.store.protocol</name>
                       <value>imap</value>
               </parameter>
               <parameter>
                       <name>mail.transport.protocol</name>
                       <value>smtp</value>
               </parameter>
               <parameter>
                       <name>mail.pop3.host</name>
                       <value>localhost</value>
               </parameter>


# Make the email mapping table writable by tomcat
chmod 664    /etc/mail/virtusertable
chmod 664    /etc/mail/virtusertable.db
chgrp tomcat /etc/mail/virtusertable


# Create lucent paths
mkdir /usr/local/tomcat/liferay/lucene


# Create sendmail users path
mkdir /home/liferay
mkdir /home/liferay/users

chown -R tomcat /home/liferay
chgrp -R tomcat /home/liferay
chmod -R 660    /home/liferay


# Create custom portal properties
# see http://www.liferay.com/static/content/portal.properties.html

vi /usr/local/tomcat/common/classes/portal-ext.properties

mail.hook.impl=com.liferay.mail.util.SendmailHook
mail.mx.update=true
mail.hook.sendmail.add.user=/usr/local/tomcat/bin/autouseradd %1%
mail.hook.sendmail.change.password=/usr/local/tomcat/bin/autopasswd %1% %2%
mail.hook.sendmail.delete.user=/usr/local/tomcat/bin/autouserdel %1%
mail.hook.sendmail.home=/home/liferay/users
mail.hook.sendmail.virtusertable=/etc/mail/virtusertable
mail.box.style=mail/
mail.username.replace=true
passwords.allow.dictionary.word=false
mail.junk-mail.warning.size=512000
mail.trash.warning.size=512000
mail.attachments.max.size=3072000
mail.audit.trail=root@PORTAL_HOST
lucene.dir /usr/local/tomcat/liferay/lucene/


# Create change password command
vi /usr/local/tomcat/bin/autopasswd

#!/usr/bin/expect -f
set password [lindex $argv 1]

spawn sudo /usr/bin/passwd [lindex $argv 0]
expect -i  $spawn_id "password:"
sleep .5
send "$password\r"
expect "password:"W
sleep .5
send "$password\r"
expect eof


# Create user add command
vi /usr/local/tomcat/bin/autouseradd

#!/usr/bin/expect -f
# 1st argument is the user id to add.
# Note: setting mail.username.replace=true in /common/classes/portal-ext.properties
#   will replace the .'s with _'s in userid, which is required for linux

set userid [lindex $argv 0]
spawn sudo /usr/sbin/adduser $userid -s /bin/false
expect eof


# Create user remove command
vi /usr/local/tomcat/bin/autouserdel

#!/usr/bin/expect -f
# 1st argument is the user id to remove
# Note: setting mail.username.replace=true in /common/classes/portal-ext.properties
#   will replace the .'s with _'s in userid, which is required for linux

set userid [lindex $argv 0]
spawn sudo /usr/sbin/userdel -r $userid
expect eof


# Set command file permissions
chmod 700    /usr/local/tomcat/bin/autopasswd
chown tomcat /usr/local/tomcat/bin/autopasswd
chgrp tomcat /usr/local/tomcat/bin/autopasswd
chmod 700    /usr/local/tomcat/bin/autouseradd
chown tomcat /usr/local/tomcat/bin/autouseradd
chgrp tomcat /usr/local/tomcat/bin/autouseradd
chmod 700    /usr/local/tomcat/bin/autouserdel
chown tomcat /usr/local/tomcat/bin/autouserdel
chgrp tomcat /usr/local/tomcat/bin/autouserdel


# Activate tomcat sudo, so it never prompts again
su tomcat
/usr/local/tomcat/bin/autouseradd badusername
/usr/local/tomcat/bin/autopasswd  badusername asst1453
/usr/local/tomcat/bin/autouserdel badusername
exit
Install Fedora Core 4.
For a minimal installation, choose to install a custom server. Deselect all packages groups. Select the package groups: Text-based Internet, Mail Server, DNS Name Server, FTP Server, MySQL Database, Network Servers, Development Tools, Legacy Software Development, Administration Tools, and System Tools.
Make sure the following RPMs are also selected. The packages cyrus-imapd and cyrus-imapd-utils are only available in Fedora Core 2 and Fedora Core 4. They were not part of Fedora Core 1 and needed to be compiled manually. In Fedora Core 4, they were moved to Extras and you will need to use yum to install these packages.
Mail Server: +cyrus-imapd, +cyrus-imapd-utils
MySQL Database: +mysql-server
Development Tools: +expect
Update Fedora. This may take a while even if you have a fast connection.
rpm --import /usr/share/rhn/RPM-GPG-KEY-fedora
              yum list yum upgrade
Turn off Sendmail.
chkconfig --level 3 sendmail off
/etc/rc.d/init.d/sendmail stop
Edit /etc/sysconfig/saslauthd.
Replace
MECH=shadowwithMECH=pam.Turn on Cyrus SASL.
chkconfig --level 3 saslauthd on
/etc/rc.d/init.d/saslauthd start
Download Cyrus IMAP. If you are using Fedora Core 2 or later, you can use the RPMs from Fedora: cyrus-imapd and cyrus-imapd-utils. If you are using Fedora Core 1 or an earlier version of Red Hat, download cyrus-imapd-2.1.16-6.src.rpm and build the RPM for your environment from the source distribution.
Build Cyrus IMAP.
rpmbuild --rebuild cyrus-imapd-2.1.16-6.src.rpm
Install Cyrus IMAP.
rpm -i cyrus-imapd-2.1.16-6.i386.rpm
rpm -i cyrus-imapd-utils-2.1.16-6.i386.rpm
Turn on Cyrus IMAP.
chkconfig --level 3 cyrus-imapd on
/etc/rc.d/init.d/cyrus-imapd start
Download the source distribution of Postfix.
Install Postfix with support for MySQL and Cyrus SASL.
rpm -ivh postfix-2.1.6-1.src.rpm
cd /usr/src/redhat/SOURCES
bash
export POSTFIX_MYSQL_REDHAT=1
export POSTFIX_SASL=2
export POSTFIX_TLS=1
sh make-postfix.spec
exit
cd /usr/src/redhat/SPECS
rpmbuild -ba postfix.spec
cd /usr/src/redhat/RPMS/i386
rpm -i --force postfix-2.1.6-1.mysql.sasl2.tls.fc4.i386.rpm
Download the source distribution of PAM MySQL.
Install PAM MySQL.
rpm -ivh pam_mysql-0.5-0.src.rpm
cd /usr/src/redhat/SPECS
rpmbuild -ba pam_mysql.spec
cd /usr/src/redhat/RPMS/i386
rpm -i pam_mysql-0.5-0.i386.rpm
Copy /mail-ejb/scripts/fedora/cyrus/mysql_virtual.cf to /etc/postfix/mysql_virtual.cf. Modify mysql_virtual.cf to point to your MySQL database.
Edit /etc/postfix/virtual. Add the line
yourdomain.com anythingfor each virtual domain that Postfix will manage. A correspending entry is needed in the MySQL database so that email to [email protected] can be delivered to a Cyrus IMAP account.Transform /etc/postfix/virtual to a format Postfix can read.
postmap /etc/postfix/virtual
Edit /etc/postfix/master.cf. Replace the two instances of
/cyrus/bin/deliverwith/usr/lib/cyrus-imapd/deliver. Add these two lines:procmail unix - n n - - pipe flags=R user=cyrus argv=/usr/bin/procmail -t -m USER=${user} EXTENSION=${extension} /home/cyrus/procmailrcEdit /etc/postfix/main.cf. Add these lines:
# # Custom Settings # mynetworks = 127.0.0.0/8, 192.168.0.0/16, 128.135.12.7/32 mailbox_command = /usr/bin/procmail -t -a "$EXTENSION" mailbox_transport = procmail virtual_maps = hash:/etc/postfix/virtual, mysql:/etc/postfix/mysql_virtual.cf smtpd_recipient_restrictions = permit_mynetworks, check_client_access hash:/etc/postfix/pop-before-smtp, check_relay_domains
Set
mynetworksto the IPs that are allowed to connect to Postfix. Turn on Postfix.chkconfig --level 3 postfix on
/etc/rc.d/init.d/postfix start
Copy /mail-ejb/scripts/fedora/cyrus/procmailrc to /home/cyrus/procmailrc. Make sure the cyrus user can access the script.
chown cyrus:mail /home/cyrus
chown cyrus:mail /home/cyrus/procmailrc.
Copy /mail-ejb/scripts/fedora/cyrus/cyrus_adduser to /usr/bin/cyrus_adduser. Edit cyrus_adduser and replace localhost with the mail server's host name. Make sure the script can be executed.
chmod u+x /usr/bin/cyrus_adduser.
Copy /mail-ejb/scripts/fedora/cyrus/cyrus_userdel to /usr/bin/cyrus_userdel. Edit cyrus_userdel and replace localhost with the mail server's host name. Make sure the script can be executed.
chmod u+x /usr/bin/cyrus_userdel.
![[Note]](images/note.png)
Note If you copy cyrus_adduser and cyrus_userdel from a Windows environment to a Linux environment, you need to run dos2unix cyrus_adduser to convert the file so that Linux can read the file correctly.
Edit /etc/pam.d/pop so that POP authentication is checked via MySQL. Remove the current lines and add these lines:
#%PAM-1.0 auth sufficient pam_mysql.so user=dbuser passwd=dbpassword host=127.0.0.1 db=cyrus table=CyrusUser usercolumn=userId passwdcolumn=password_ crypt=0 account required pam_mysql.so user=dbuser passwd=dbpassword host=127.0.0.1 db=cyrus table=CyrusUser usercolumn=userId passwdcolumn=password_ crypt=0
Edit /etc/pam.d/imap so that IMAP authentication is checked via MySQL. Remove the current lines and add these lines:
#%PAM-1.0 auth sufficient pam_mysql.so user=dbuser passwd=dbpassword host=127.0.0.1 db=cyrus table=CyrusUser usercolumn=userId passwdcolumn=password_ crypt=0 account required pam_mysql.so user=dbuser passwd=dbpassword host=127.0.0.1 db=cyrus table=CyrusUser usercolumn=userId passwdcolumn=password_ crypt=0
Turn on MySQL.
chkconfig --level 3 mysqld on
/etc/rc.d/init.d/mysqld start
Configure MySQL so that it can be accessed by the username dbuser and password dbpassword.
use mysql;
insert into user values ('127.0.0.1', "dbuser", password("dbpassword"), "Y", "Y", "Y", "Y", "Y", "Y", "Y", "Y", "Y", "Y", "Y", "Y", "Y", "Y");
Create the database and tables that will be used to authenticate IMAP users.
create database cyrus;
use cyrus;
create table CyrusUser ( userId varchar(75) not null primary key, password_ varchar(75) not null );
create table CyrusVirtual ( emailAddress varchar(75) not null primary key, userId varchar(75) not null );
The Expect scripts
cyrus_adduserandcyrus_userdelthat are used to add and delete Cyrus IMAP users require a default cyrus user to authenticate with.insert into CyrusUser (userId, password_) values ('cyrus', 'cyrus_password');
Every virtual domain requires a [email protected] entry so that email to [email protected] can be delivered to a Cyrus IMAP account.
insert into CyrusVirtual (emailAddress, userId) values ('[email protected]', 'your_domain_1');
Create a default account for your_domain_1.
insert into CyrusUser (userId, password_) values ('your_domain_1', 'your_password');
insert into CyrusVirtual (emailAddress, userId) values ('[email protected]', 'your_domain_1');
quit;
cyrus_adduser cyrus_password your_domain_1
Turn on SpamAssassin.
chkconfig --level 3 spamassassin on
/etc/rc.d/init.d/spamassassin start
Download ClamAV.
Install ClamAV.
rpm -i clamav-0.86.1-1.i386.rpm
Turn on ClamAV.
chkconfig --level 3 clamd on
/etc/rc.d/init.d/clamd start
Download ClamAssassin.
Install ClamAssassin.
gunzip clamassassin-1.2.2.tar.gz
tar xvf clamassassin-1.2.2.tar
cd clamassassin-1.2.2
./configure
cp clamassassin /usr/local/bin
Edit /usr/local/bin/clamassassin.
Set
SUBJECTHEADto "[VIRUS]".Copy /mail-ejb/scripts/fedora/cyrus/procmail_vacation to /usr/local/bin/procmail_vacation. Make sure the script can be executed.
chmod u+x /usr/local/bin/procmail_vacation.
Download SendEmail.
Install SendEmail.
gunzip sendEmail-v1.52.tar.gz
tar xvf sendEmail-v1.52.tar
cd sendEmail-v1.52
chmod u+x sendEmail
chown cyrus:mail sendEmail
cp sendEmail /usr/local/bin
Download the source distribution of Pop-before-smtp.
Pop-before-smtp requires perl-TimeDate and perl-Net-Netmask.
Install perl-TimeDate from the distributed RPM.
Install perl-Net-Netmask.
perl -MCPAN -e 'install Net::Netmask'
Install Pop-before-smtp.
gunzip pop-before-smtp-1.38.tar.gz
tar xvf pop-before-smtp-1.38.tar
cd pop-before-smtp-1.38
chown root:root *
cp pop-before-smtp.init /etc/rc.d/init.d/pop-before-smtp
cp pop-before-smtp /usr/sbin/
cp pop-before-smtp-conf.pl /etc
Edit /etc/pop-before-smtp-conf.pl by uncommenting and modifying certain sections so it matches the following information.
$dbfile = '/etc/postfix/pop-before-smtp'; $grace = 120*60; # Set the log file we will watch for pop3d/imapd records. $file_tail{'name'} = '/var/log/maillog'; # For Cyrus (including a tweak for IP addrs that don't resolve): $pat = '^(... .. ..:..:..) \S+ (?:pop3d|imapd)\[\d+\]: ' .Turn on Pop-before-smtp.
chkconfig --level 3 pop-before-smtp on
/etc/rc.d/init.d/pop-before-smtp start
Restart your mail server.
shutdown -r now
First build a generic Liferay email hook, ShellHook.java, that
shells out all of the email methods. You install it by adding these
lines to portal-ext.properties:
mail.hook.impl=com.liferay.mail.util.ShellHook
mail.hook.shell.script=/usr/sbin/mailadmin.ksh
mail.box.style=INBOX
We next built a generic Korn Shell Script, mailadmin.ksh, that implements each method for Dovecot, or any other email system you want. It supports an interactive command line interface for testing:
mailadmin.ksh --help
mailadmin.ksh
mailadmin.ksh addForward [userId]
[emailAddresses]
mailadmin.ksh addUser [userId] [password] [firstName]
[middleName] [lastName] [emailAddress]
mailadmin.ksh addVacationMessage [userId]
[emailAddress] [vacationMessage]
mailadmin.ksh deleteEmailAddress
[userId]
mailadmin.ksh deleteUser [userId]
mailadmin.ksh updateBlocked [userId]
[blockedEmailAddress]
mailadmin.ksh updateEmailAddress [userId]
[emailAddress]
mailadmin.ksh updatePassword [userId]
[password]
All of the code is in SVN. mailadmin is at: mail-ejb/scripts/fedora/ksh/mailadmin.ksh Here are the step-by-step installation instructions:
# Edit SASL-auth authentication to use MySQL with the Postfix setup
vi /etc/pam.d/smtp
#%PAM-1.0
auth sufficient pam_mysql.so user=DBUSR passwd=DBPASSWD host=127.0.0.1 db=mail table=postfix_users usercolumn=email passwdcolumn=clear crypt=0
account required pam_mysql.so user=DBUSR passwd=DBPASSWD host=127.0.0.1 db=mail table=postfix_users usercolumn=email passwdcolumn=clear crypt=0
# CONFIGURE VMAIL USER AND EMAIL PATHS
groupadd -g 510 vmail
useradd -u 510 -g vmail vmail
mkdir -p /var/vmail/EMAILDOMAIN
chown -R vmail:vmail /var/vmail
chmod -R 770 /var/vmail
# Add vmail user to tomcat group and tomcat user to vmail group
# Note the vmail uid, 510, is inserted into the postfix_users table below
vi /etc/group
tomcat:x:500:vmail
vmail:x:510:tomcat
# CONFIGURE MYSQL
# Add DBUSR to MySql database for managing email tables
mysql -u root -p
use mysql;
insert into user values ('127.0.0.1', "DBUSR", old_password("DBPASSWD"), "Y", "Y", "Y", "Y", "Y", "Y", "Y", "Y", "Y", "Y", "Y", "Y", "Y", "Y");
commit;
quit
# Login as email user and build email database, "mail", and postfix tables
mysql -u DBUSR -p
create database mail;
use mail;
CREATE TABLE postfix_alias (
id int(11) unsigned NOT NULL auto_increment,
alias varchar(128) NOT NULL default '',
destination varchar(128) NOT NULL default '',
PRIMARY KEY (id)
) TYPE=MyISAM;
CREATE TABLE postfix_relocated (
id int(11) unsigned NOT NULL auto_increment,
email varchar(128) NOT NULL default '',
destination varchar(128) NOT NULL default '',
PRIMARY KEY (id)
) TYPE=MyISAM;
CREATE TABLE postfix_transport (
id int(11) unsigned NOT NULL auto_increment,
domain varchar(128) NOT NULL default '',
destination varchar(128) NOT NULL default '',
PRIMARY KEY (id),
UNIQUE KEY domain (domain)
) TYPE=MyISAM;
CREATE TABLE postfix_users (
id int(11) unsigned NOT NULL auto_increment,
email varchar(128) NOT NULL default '',
clear varchar(128) NOT NULL default '',
crypt varchar(128) NOT NULL default '',
name tinytext NOT NULL,
uid int(11) unsigned NOT NULL default '1004',
gid int(11) unsigned NOT NULL default '1004',
homedir tinytext NOT NULL,
maildir tinytext NOT NULL,
quota tinytext NOT NULL,
access enum('Y','N') NOT NULL default 'Y',
postfix enum('Y','N') NOT NULL default 'Y',
PRIMARY KEY (id),
UNIQUE KEY email (email)
) TYPE=MyISAM;
CREATE TABLE postfix_virtual (
id int(11) unsigned NOT NULL auto_increment,
email varchar(128) NOT NULL default '',
destination varchar(128) NOT NULL default '',
PRIMARY KEY (id)
) TYPE=MyISAM;
CREATE TABLE postfix_access (
id int(10) unsigned NOT NULL auto_increment,
source varchar(128) NOT NULL default '',
access varchar(128) NOT NULL default '',
type enum('recipient','sender','client') NOT NULL default 'recipient',
PRIMARY KEY (id)
) TYPE=MyISAM
commit;
# Add an email domain
INSERT INTO `postfix_transport` VALUES
(3,'EMAILDOMAIN','virtual:');
# Add an email user (automated by Liferay using ShellHook, and mailadmin.ksh)
# vmail uid is 510
INSERT INTO `postfix_users` VALUES
(17,'LIFERAYUSR@EMAILDOMAIN','LIFERAYPWD','','',510,510,'/var/vmail','EMAILDOMAIN/LIFERAYUSR/Maildir/','','Y','Y');
# Add an email forward
INSERT INTO `postfix_virtual` VALUES
(27,'LIFERAYLOGIN','LIFERAYUSR@EMAILDOMAIN');
commit;
quit
# CONFIGURE POSTFIX
cd /etc/postfix/
rm -rf ssl/
rm -rf sasl/
vi /etc/postfix/mysql-aliases.cf
user = DBUSR
password = DBPASSWD
dbname = mail
table = postfix_alias
select_field = destination
where_field = alias
hosts = 127.0.0.1
vi /etc/postfix/mysql-client.cf
user = DBUSR
password = DBPASSWD
dbname = mail
table = postfix_access
select_field = access
where_field = source
additional_conditions = and type = 'client'
hosts = 127.0.0.1
vi /etc/postfix/mysql-recipient.cf
user = DBUSR
password = DBPASSWD
dbname = mail
table = postfix_access
select_field = access
where_field = source
additional_conditions = and type = 'recipient'
hosts = 127.0.0.1
vi /etc/postfix/mysql-relocated.cf
user = DBUSR
password = DBPASSWD
dbname = mail
table = postfix_relocated
select_field = destination
where_field = email
hosts = 127.0.0.1
vi /etc/postfix/mysql-sender.cf
user = DBUSR
password = DBPASSWD
dbname = mail
table = postfix_access
select_field = access
where_field = source
additional_conditions = and type = 'sender'
hosts = 127.0.0.1
vi /etc/postfix/mysql-transport.cf
user = DBUSR
password = DBPASSWD
dbname = mail
table = postfix_transport
select_field = destination
where_field = domain
hosts = 127.0.0.1
vi /etc/postfix/mysql-virtual-gid.cf
user = DBUSR
password = DBPASSWD
dbname = mail
table = postfix_users
select_field = gid
where_field = email
additional_conditions = and postfix = 'y'
hosts = 127.0.0.1
vi /etc/postfix/mysql-virtual-maps.cf
user = DBUSR
password = DBPASSWD
dbname = mail
table = postfix_users
select_field = maildir
where_field = email
additional_conditions = and postfix = 'y'
hosts = 127.0.0.1
vi /etc/postfix/mysql-virtual-uid.cf
user = DBUSR
password = DBPASSWD
dbname = mail
table = postfix_users
select_field = uid
where_field = email
additional_conditions = and postfix = 'y'
hosts = 127.0.0.1
vi /etc/postfix/mysql-virtual.cf
user = DBUSR
password = DBPASSWD
dbname = mail
table = postfix_virtual
select_field = destination
where_field = email
hosts = 127.0.0.1
chmod 640 /etc/postfix/mysql-*
chown root:postfix /etc/postfix/mysql-*
vi /etc/postfix/main.cf
# see /usr/share/postfix/main.cf.dist for a commented, fuller version of this file.
# Do not change these directory settings - they are critical to Postfix operation.
command_directory = /usr/sbin
daemon_directory = /usr/libexec/postfix
program_directory = /usr/libexec/postfix
smtpd_banner = $myhostname ESMTP $mail_name
setgid_group = postdrop
biff = no
append_dot_mydomain = no
myhostname = EMAILDOMAIN
myorigin = $myhostname
mydestination = EMAILDOMAIN, $transport_maps
relayhost =
mynetworks = 127.0.0.0/8
mailbox_command =
mailbox_size_limit = 0
recipient_delimiter = +
smtpd_sasl_auth_enable = yes
smtpd_recipient_restrictions = permit_sasl_authenticated, permit_mynetworks, reject_unauth_destination
smtpd_sasl_security_options = noanonymous
smtpd_sasl_local_domain = $myhostname
broken_sasl_auth_clients = yes
smtpd_recipient_restrictions = permit_mynetworks, permit_sasl_authenticated, check_recipient_access mysql:/etc/postfix/mysql-recipient.cf, reject_unauth_destination, permit
smtpd_sender_restrictions = check_sender_access mysql:/etc/postfix/mysql-sender.cf
smtpd_client_restrictions = check_client_access mysql:/etc/postfix/mysql-client.cf
alias_maps = mysql:/etc/postfix/mysql-aliases.cf
relocated_maps = mysql:/etc/postfix/mysql-relocated.cf
transport_maps = mysql:/etc/postfix/mysql-transport.cf
virtual_maps = mysql:/etc/postfix/mysql-virtual.cf
virtual_mailbox_base = /var/vmail
virtual_mailbox_maps = mysql:/etc/postfix/mysql-virtual-maps.cf
virtual_uid_maps = mysql:/etc/postfix/mysql-virtual-uid.cf
virtual_gid_maps = mysql:/etc/postfix/mysql-virtual-gid.cf
local_recipient_maps = $alias_maps $virtual_mailbox_maps
chmod 644 /etc/postfix/main.cf
chown root:root /etc/postfix/main.cf
vi /etc/postfix/master.cf
smtp inet n - n - - smtpd
pickup fifo n - n 60 1 pickup
cleanup unix n - n - 0 cleanup
qmgr fifo n - n 300 1 qmgr
rewrite unix - - n - - trivial-rewrite
bounce unix - - n - 0 bounce
defer unix - - n - 0 bounce
trace unix - - n - 0 bounce
verify unix - - n - 1 verify
flush unix n - n 1000? 0 flush
proxymap unix - - n - - proxymap
smtp unix - - n - - smtp
relay unix - - n - - smtp
showq unix n - n - - showq
error unix - - n - - error
local unix - n n - - local
virtual unix - n n - - virtual
lmtp unix - - n - - lmtp
anvil unix - - n - 1 anvil
maildrop unix - n n - - pipe
flags=DRhu user=vmail argv=/usr/local/bin/maildrop -d ${recipient}
old-cyrus unix - n n - - pipe
flags=R user=cyrus argv=/usr/lib/cyrus-imapd/deliver -e -m ${extension} ${user}
cyrus unix - n n - - pipe
user=cyrus argv=/usr/lib/cyrus-imapd/deliver -e -r ${sender} -m ${extension} ${user}
uucp unix - n n - - pipe
flags=Fqhu user=uucp argv=uux -r -n -z -a$sender - $nexthop!rmail.postfix ($recipient)
ifmail unix - n n - - pipe
flags=F user=ftn argv=/usr/lib/ifmail/ifmail -r $nexthop ($recipient)
bsmtp unix - n n - - pipe
flags=Fq. user=foo argv=/usr/local/sbin/bsmtp -f $sender $nexthop $recipient
procmail  unix  -       n       n       -       -       pipe
  flags=R user=cyrus argv=/usr/bin/procmail -t -m USER=${user}
EXTENSION=${extension} /home/cyrus/procmailrc
chmod 644 /etc/postfix/master.cf
chown root:root /etc/postfix/master.cf
# CONFIGURE DOVECOT
cd
wget http://dag.wieers.com/packages/dovecot/dovecot-0.99.13-1.1.el3.rf.i386.rpm
apt-get install rh-postgresql-libs
rpm -Uvh dovecot-0.99.13-1.1.el3.rf.i386.rpm
vi /etc/dovecot.conf
protocols = imaps pop3s imap pop3
ssl_disable = yes
ssl_cert_file = /etc/ssl/certs/dovecot.pem
ssl_key_file = /etc/ssl/private/dovecot.pem
login = imap
login_executable = /usr/libexec/dovecot/imap-login
login = pop3
login_executable = /usr/libexec/dovecot/pop3-login
mail_extra_groups = mail
default_mail_env = maildir:/var/vmail/%d/%n/Maildir
imap_executable = /usr/libexec/dovecot/imap
pop3_executable = /usr/libexec/dovecot/pop3
auth = default
auth_mechanisms = plain
auth_default_realm = EMAILDOMAIN
auth_userdb = mysql /etc/dovecot-mysql.conf
auth_passdb = mysql /etc/dovecot-mysql.conf
auth_user = root
auth_verbose = yes
vi /etc/dovecot-mysql.conf
db_host = 127.0.0.1
db_port = 3306
db = mail
db_user = DBUSR
db_passwd = DBPASSWD
db_client_flags = 0
default_pass_scheme = PLAIN
password_query = SELECT clear FROM postfix_users WHERE email = '%n@%d' or email = '%n@EMAILDOMAIN'
user_query = SELECT maildir, uid, gid FROM postfix_users WHERE email = '%n@%d' or email = '%n@EMAILDOMAIN'
# CONFIGURE LIFERAY
# configure mailadmin.ksh
cp mailadmin.ksh /usr/sbin
vi /usr/sbin/mailadmin.ksh
DOMAIN=EMAILDOMAIN # Domain being managed
MYSQL_USERNAME=DBUSR # MySQL user
MYSQL_PASSWORD=DBPASSWD # MySQL password
TOMCAT_UID=500 # Mail File Creation user id - tomcat
VMAIL_GID=510 # Mail File Creation group id - vmail
chmod 750 /usr/sbin/mailadmin.ksh
chown tomcat:tomcat /usr/sbin/mailadmin.ksh
# create mailadmin log file
touch /var/log/mailadmin.log
chmod 660 /var/log/mailadmin.log
chown tomcat:tomcat /var/log/mailadmin.log
# configure Liferay to use mailadmin.ksh
vi /usr/local/tomcat/common/classes/portal-ext.properties
mail.hook.impl=com.liferay.mail.util.ShellHook
mail.hook.shell.script=/usr/sbin/mailadmin.ksh
mail.box.style=INBOX
# update these JARs with latest from SVN HEAD
/usr/local/tomcat/common/lib/ext/mail-ejb.jar -> add com.liferay.mail.util.ShellHook.class
/usr/local/tomcat/common/lib/ext/portal-ejb.jar -> update com.liferay.portal.util.PropsUtil.class
/usr/local/tomcat/common/lib/ext/portal-ejb.jar -> update com.liferay.util.StringUtil.class
# Configure Tomcat
#add mail/MailSession settings
vi /usr/local/tomcat/conf/Catalina/localhost/liferay.xml
<parameter>
<name>mail.smtp.host</name>
<value>localhost</value>
</parameter>
<parameter>
<name>mail.imap.host</name>
<value>localhost</value>
</parameter>
<parameter>
<name>mail.store.protocol</name>
<value>imap</value>
</parameter>
<parameter>
<name>mail.transport.protocol</name>
<value>smtp</value>
</parameter>
<parameter>
<name>mail.pop3.host</name>
<value>localhost</value>
</parameter>
# Enable autostart on reboots
chkconfig postfix on
chkconfig dovecot on
# Verify Install Commands
tail -f 50 /var/log/maillog
tail -f 50 /var/log/messages
# Restart saslauthd before Postfix, so that Postfix doesn't start with
# a bad SASL setup, otherwise it doesn't answer smtp requests
/etc/init.d/saslauthd restart
# make sure saslauthd restarts
ps -ef | grep saslauthd | grep -v grep
# make sure postfix restarts
/etc/init.d/postfix restart
ps -ef | grep postfix | grep -v grep
# make sure dovecot restarts
/etc/init.d/dovecot restart
ps -ef | grep dovecot | grep -v grep
reboot
# make sure everything starts
ps -ef | grep postfix | grep -v grep
ps -ef | grep dovecot | grep -v grep
ps -ef | grep saslauthd | grep -v grep
# Test SMTP by sending an email to LIFERAYUSR@EMAILDOMAIN
telnet localhost 25
EHLO EMAILDOMAIN
MAIL FROM:[email protected]
RCPT TO:LIFERAYUSR@EMAILDOMAIN
DATA
Test msg
.
quit
# Test SMTP by sending an email to alias LIFERAYLOGIN
telnet localhost 25
EHLO EMAILDOMAIN
MAIL FROM:[email protected]
RCPT TO:LIFERAYLOGIN
DATA
Test msg
.
quit
#TEST IMAP by logging in as LIFERAYUSR@EMAILDOMAIN
telnet localhost imap
x LOGIN LIFERAYUSR@EMAILDOMAIN LIFERAYPWD
x STATUS "INBOX" (MESSAGES)
x SELECT "INBOX"
x FETCH 1 BODY[HEADER]
x LOGOUT
# Test using usedId without a Domain name
telnet localhost imap
x LOGIN LIFERAYUSR LIFERAYPWD
x STATUS "INBOX" (MESSAGES)
x SELECT "INBOX"
x FETCH 1 BODY[HEADER]
x LOGOUT
In this section you will learn about LDAP integration. The initial set of instructions will guide you through the installation of the Apache directory server and an LDAP browser. The instructions will then guide you to input a user into the LDAP browser. After the user has been entered into the browser the user will be integrated with Liferay Portal.
Go to www.apache.org.
Click Directory.
Click Download.
Click on the suggested mirror site for download.
Click apacheds>stable>1.0>1.0 RC3>apacheds-1.0-RC3-win32-setup.exe
Save file.
Click on the Apache icon and follow the installation instructions.
Click Start.
Go to www.jxplorer.org.
Click Downloads>precompiled java package>Windows platform.
Save file.
Click on the LDAP browser icon and follow the installation instructions.
Open the LDAP browser.
Click File>Connect.
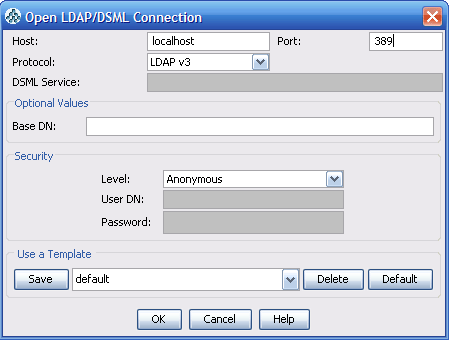
Change the port to 10389.
In the Level drop-down menu, choose User+Password.
Insert
uid=admin,ou=systemin the User DN input field.The password is secret.
Click Save and enter a name for the template.
Right click on Example and click New.

Add inetorgperson to the Selected Class.
User Jane Smith will be added. Enter cn=janesmith in the Enter RDN field and click OK.

In the Table Editor enter Smith in the SN line.
Enter Jane in the givenName line.
For the mail enter [email protected].
For the userpassword enter test.
Click Submit.
With user Jane Smith entered into the LDAP browser, the user will now be integrated with Liferay Portal. Begin by logging into Liferay Portal as the Administrator.
The login is [email protected] and the password is test.
Currently, Jane Smith’s profile exists only on the LDAP browser. To integrate her information into Liferay Portal, click on the Users tab in the Admin portlet.

Click Authentication.
Click LDAP.
Check the Enabled box.

If the Required box is checked only users in the LDAP server will be able to log into Liferay Portal. For this demonstration leave the box unchecked.
Liferay Portal supports other directory servers in addition to the ones provided. The Apache Directory Server, Microsoft Active Directory Server, and Novell eDirectory comes preconfigured.

Select the Apache Directory Server and click Save.
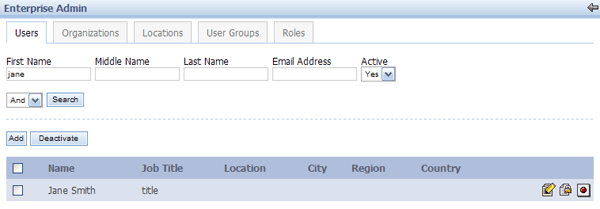
Once Jane Smith logs in to her account on Liferay Portal and agrees to the terms of use, her user information will be added to Liferay Portal. To demonstrate this, assume that Jane Smith has logged into her account. While logged in as the Administrator, a search for Jane Smith will show that the user has been integrated into Liferay Portal.
![[Note]](images/note.png) | Note |
|---|---|
Windows Firewall must be turned off for the Chat Portlet to run properly |
Create a folder and name it Wildfire.
Download the Wildfire Server at www.jivesoftware.com. It is recommended that you download the zip file. If you do not have Java JRE on your machine you must use the .exe file.
Extract the file to the Wildfire folder.
Open the Wildfire folder and click on bin.
Click on wildfire.exe.
Click Launch Admin.
Proceed with configuring Wildfire based on your requirements.
To configure Wildfire with Liferay, open portal-ext.properties (\webapps\Root\WEB-INF\classes).
Enter the following:
jabber.xmpp.server.enabled=true
reverse.ajax.enabled=true
Save the changes.
To view the Chat Portlet go to Liferay Portal and sign in as a user.
Add the Chat Portlet to you desktop.
![[Note]](images/note.png) | Note |
|---|---|
In a production environment the CAS server should run on its own Tomcat instance but for purposes of this demonstration we will drop it in the same instance as Liferay Portal. |
Go to the server.xml file and uncomment the SSL section to open port 8443.

Save.
Download the
Liferay-portal-servicemix-4.2.0.warfile from www.liferay/web/guest/downloads.Rename the file to
cas-web.war.Copy the war file and paste it to the Tomcat webapps directory.
To download the Yale CAS Client 2.0.11 go to http://www.ja-sig.org/products/cas/downloads/index.html.
Create a folder and extract the cas.client zip file into this folder.
Open the folder and navigate to the casclient jar file (cas-client-2.0.11\java\lib).
Copy the file.
Go to the lib file in Tomcat (webapps\ROOT\WEB_INF\lib) and paste the casclient jar file to replace the existing one.
In the command prompt go to the ROOT directory.
Enter the following:
keytool -genkey -alias tomcat -keypass changeit -keyalg RSA
Enter changeit for the password.
Anser the list of questions. Note that the first and last name must be the host name of your server and cannot be an IP address. This is very important because an IP address will fail client hostname verification even if it is correct.
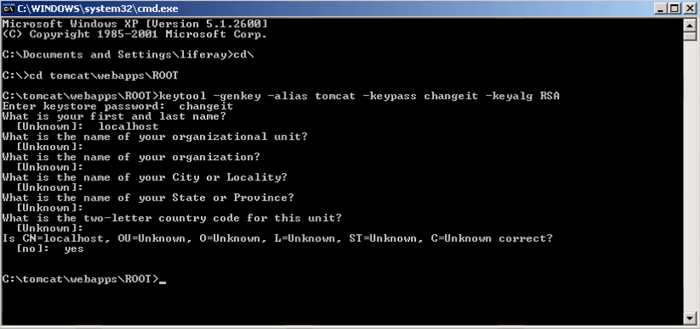
Enter the following command to export he cert you generated from your personal keystore:
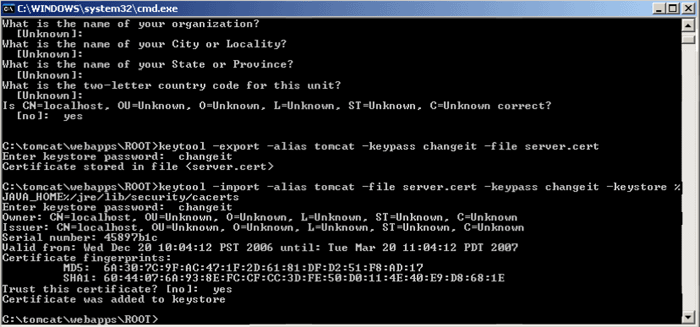
keytool -export -alias tomcat -keypass changeit -file server.cert
Enter changeit for the password.
Import the cert into Java's keystore with this command:
keytool -import -alias tomcat -file %FILE_NAME% -keypass changeit -keystore %JAVA_HOME%/jre/lib/security/cacerts
Enter changeit for the password.
Enter yes.
To set up Liferay Portal, navigate to the classes file in Tomcat (webapps\ROOT\WEB_INF\classes).
Create systemext.properties.
Open system-ext.properties and enter:
com.liferay.filters.sso.cas.CASFilter=true
Save.
Open portal-ext.properties and enter:
#auto.login.hooks=com.liferay.portal.security.auth.BasicAutoLogin
auto.login.hooks=com.liferay.portal.security.auth.BasicAutoLogin,com.liferay.portal.security.auth.CASAutoLogin
Save.
Start Tomcat and go to Liferay Portal.
Click Sign In. If everything is set up correctly you will be redirected to the CAS server’s login screen.
The workflow services allows a user to define through the workflow portlet any number of simple to complex business processes/workflows, deploy them, and manage them through a portal interface. The power of this portlet is that it allows users to create forms-based data entry applications that have knowledge of users, groups, and roles without writing a single line of code – it only requires creation of a single XML document. The portlet relies on Apache ServiceMix to function as an Enterprise Service Bus that acts as a broker between the portal and a workflow engine. Essentially, the portal provides a generic interface through which workflow services are requested via normal HTTP calls. The requests are routed through ServiceMix which in turn calls a workflow engine implementation that the user has defined in the ServiceMix configuration. By default, Liferay provides an implementation of JBoss’ jBPM workflow engine (version 3.1.2).
The next section provides detailed installation instructions for setting up the environment for using the Workflow portlet. The instructions are for Tomcat, but can be easily adapted for any application server. After installing, refer to the user guides for more information on how to use the workflow portlet to create custom business processes.
Because the default implementation of the workflow portlet depends on both ServiceMix and jBPM, the installation requires more than just the normal portal bundle. The following provides detailed instructions for deploying the workflow portlet and testing it with a simple process.
It is assumed that Liferay Portal has already been installed following one of the procedures explained earlier. If it's currently running stop it.
Download the latest version of liferay-portal-servicemix-4.2.x.war and liferay-portal-jbpm-4.2.x.war (substituting the 'x' with the highest number available) from Liferay's download page. Rename them to “servicemix-web.war” and “jbpm-web.war” respectively.
Move the wars from step 2 to the
$TOMCAT_HOME/webappsdirectory.Delete the C:\home\liferay directory if it exists.
Go to the
$TOMCAT_HOME/bindirectory and runstartup.bat.
To test the installation we are going to use the Workflow portlet to create a simple definition and add and instance of it:
Login to the portal. The default user is [email protected] with password test.
Add "Workflow" portlet to a page.
Click on the Definitions tab.
Click on the Add button.
Copy and paste the contents of
jbpm-web.war/WEB-INF/definitions/datatypes_definition.xmlinto the text area and click the Save New Version button.Click on the Add Instance icon.
From the Instances tab, click on the Manage icon next to Enter data.
Fill out the form and click the Save button; alternatively, you can test the various error checking capabilities by inputting incorrect values and clicking the Save button.
Eventually, enter correct values and click the Save button.
From the Instances tab, click on the Manage icon next to View Data.
Confirm that all the data was entered correctly and click the Finished button.
Confirm that the instance is now in the End state.
The default implementation of jBPM uses an HSQL database found in jbpm-web.war/WEB-INF/sql/jbpm.*. To change the location of the HSQL database, change the value of the hibernate.connection.url property in jbpm-web.war/WEB-INF/classes/hibernate.cfg.xml. The location is addressed to where the start up script for your server is located.
To use a database other than HSQL, first create the database schema using one of the SQL create scripts supplied in the jbpm-web.war/WEB-INF/sql directory. Then uncomment the corresponding hibernate connection properties block in jbpm-web.war/WEB-INF/classes/hibernate.cfg.xml.
Liferay Portal 4.2 provides a portlet that allows the publication of Alfresco contents through the portal. Liferay's download page provides an Alfresco package prepared for deployment.
Download the Alfresco war file: http://downloads.sourceforge.net/lportal/liferay-portal-alfresco-4.2.1.war?download.
Rename the file to
alfresco.war.Increase the maximum memory. If you do not do this you will get a PermGen memory error.
Go to
tomcat/bin/catalina.bat. Look for a line that looks similar to the following:SET JAVA_OPTS="-Xms128m -Xmx512m -Dfile.encoding=UTF8 -Duser.timezone=GMT -Djava.security.auth.login.config=$CATALINA_HOME/conf/jaas.config"
![[Note]](images/note.png)
Note In Linux/UNIX, edit catalina.sh instead. The line should be the same but without the SET command at the beginning.
Edit to increase the memory size:
SET JAVA_OPTS="-Xms1024m -Xmx1024m -XX:MaxPermSize=128m -Dfile.encoding=UTF8 -Duser.timezone=GMT -Djava.security.auth.login.config=$CATALINA_HOME/conf/jaas.config"
Startup Tomcat.
Log in as the administrator.
In the Admin Portlet, click on the Auto Deploy tab.
Click Browse and locate the
alfresco.warfile.Click Deploy.
You can now add the Alfresco Client and Alfresco Content portlet to your page.
Table of Contents
Liferay was built from the ground up to be used by application service providers. By installing multiple portal instances a complate isolation of the users, organizations, locations, communities and any other data created through Liferay's portlets is achieved. This is possible because all of the tables used by Liferay have a column called companyId that identifies the portal instance to which the entry belongs.
The following is a sample list of portals running off of one portal instance hitting one database and shows the capabilities of Liferay: http://demo.liferay.net, http://my.ccuc.net, http://my.3sixteen.com, http://www.gatewayfriends.org, http://www.jasonandiris.com. Users in each of these portals have no information about the other portals. They are separated by domain and each portal exists in its own space based on the company's id.
The installation of multiple portal instances is specific to each application server. Following detailed steps for the most common ones are provided. These instructions assume that one instance of Liferay Portal is already installed and is working. Two example domain names, www.alpha.com and www.beta.com will be used, change them with the real ones for a live environment. Finally, although these instructions are for only two instances, the same process can be applied to add as many instances as supported by the system resources.
The following steps are common for all applications servers:
Stop the application server
Edit the
hostssystem file (C:\Windows\system32\drivers\etc\hostsin windows and/etc/hostsin Linux/UNIX) so that www.alpha.com and www.beta.com resolve to your local machine. This will help in testing the setup.127.0.0.1 www.alpha.com 127.0.0.1 www.beta.com
Use a database running in server mode. If HSQL is being used, it is possible to configure it to run in server mode but we recommend using MySQL, PostgreSQL or any production-ready database instead. Follow the instructions in the previous sections for more information on how to configure the database that Liferay Portal is using.
It is recommended to start with a clean database. The new instances will use it's own data so existing data will not be accessible from them.
Comming soon. Meanwhile refer to the instructions provided by the Virtual Hosting article in LiferayPedia.
Rename
$JBOSS_HOME/server/default/deploy/ext.ear/portal-web-complete.wartoportal-web-alpha.war.Copy
$JBOSS_HOME/server/default/deploy/ext.ear/portal-web-alpha.wartoportal-web-beta.war.Edit
$JBOSS_HOME/server/default/deploy/ext.ear/portal-web-alpha.war/WEB-INF/web.xmland change the value of the company id to alpha.com.<context-param> <param-name>company_id</param-name> <param-value>alpha.com</param-value> </context-param>On startup, the portal will create the necessary database entries and create a default user account with
[email protected]as the login andtestas the password.Repeat this step for
$JBOSS_HOME/server/default/deploy/ext.ear/portal-web-beta.war/WEB-INF/web.xmlbut replace alpha.com with beta.com.Edit $JBOSS_HOME/server/default/deploy/ext.ear/portal-web-alpha.war/WEB-INF/jboss-web.xml to add the context root and virtual host.
<jboss-web>
    <security-domain>java:/jaas/PortalRealm</security-domain>
    <context-root>/</context-root>
    <virtual-host>www.alpha.com</virtual-host>
    ...
</jboss-web>

Repeat this step for /server/default/deploy/ext.ear/portal-web-beta.war/WEB-INF/jboss-web.xml but replace alpha.com with beta.com.
Edit
$JBOSS_HOME/server/default/deploy/ext.ear/META-INF/application.xml.Remove the old reference to
portal-web-complete.warand add the references toportal-web-alpha.warandportal-web-beta.war.<module> <web> <web-uri>portal-web-alpha.war</web-uri> <context-root>/</context-root> </web> </module> <module> <web> <web-uri>portal-web-beta.war</web-uri> <context-root>/</context-root> </web> </module>Edit
$JBOSS_HOME/server/default/deploy/jbossweb-tomcat50.sar/server.xmlto add the alpha and beta hosts.<Engine name="jboss.web" defaultHost="www.alpha.com"> ... <Host name="www.alpha.com" ... ... <DefaultContext cookies="true" crossContext="true" override="true" /> </Host> <Host name="www.beta.com" ... ... <DefaultContext cookies="true" crossContext="true" override="true" /> </Host> </Engine>Start JBoss+Tomcat and access the portals with your browser at http://www.alpha.com and
http://www.beta.com. Your user login and password combinations are[email protected]/testand[email protected]/test.
This guide has explained how to install and configure Liferay Portal for the main supported applications servers and databases.
Note that for a production environment you will need to do some extra fine tunning operations. If you need help you can use the community support or the professional support services referred to in the preface of the document.
